(metallic whooshing) – Now I've got a drill for
you that I guarantee you, you do this for 10 minutes, you're gonna be a better golfer. All right, so let's jump right into it. A big piece of being consistent
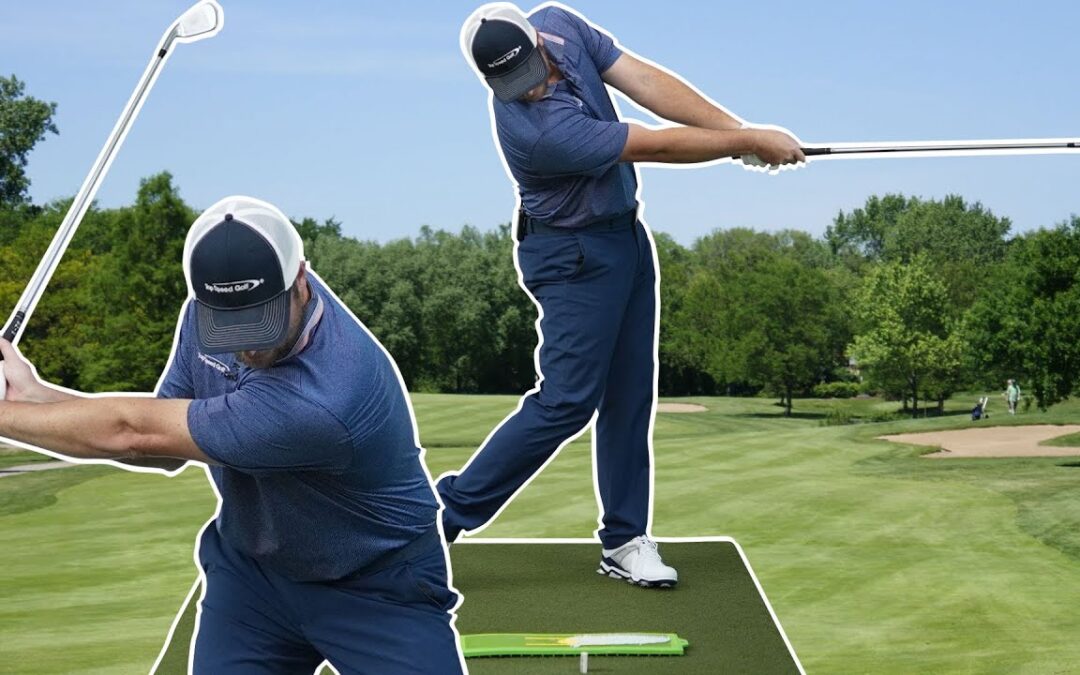
in golf is controlling from halfway in the downswing, until my arms are extended toward the target and the follow through. So let's go over what
this should look like.
The first piece here is my shoulders. I want you to grab a club,
put it across your shoulders, just like this. You can even rest, I'll
try not to hit my mic here, but if I rest it across
the tips of my shoulders, I want to swing back, and this is kind of where
I'd be in my downswing. My left shoulder and
the club that's sticking on my left shoulder, should be pointing just
right around the golf ball, and it doesn't wanna be level like this.
If I level out, I'm not in good
shape, I want to be tilted. So this is level, my left
shoulder feels like it's way down. My right shoulder feels like it's way up. From there, I'm gonna shift
my weight to the left, get a little weight shift, and then I'm gonna swing
through until my right shoulder is pointing at where
the golf ball would be. (bubble popping)
That's back in through, that's the golf swing. So go ahead and do that about two minutes.
(mouse clicking) Get the feeling of left shoulder down,
(bell dinging) right shoulder down. So it's left shoulder,
shift, right shoulder. Go back, left shoulder,
shift, right shoulder. From there, we're gonna add the club.
So the second piece of
that is I'm gonna go here, halfway back, same shoulder position, weight shift, and then I extend my
club toward the target as I stay in my posture. So it looks like this. Left shoulder, halfway back, weight shift, rotate on through, and now my club is parallel
with the ground here when I end. It's about chest high. On the back swing, we have lag. On the start of the downswing we have lag, so that's at about a 90 degree angle. So it's not straight up and down like this if we're looking from down the line.
It's on plane, it's also
toward the golf ball. So everything is working
down toward the golf ball, but it has an angle when
we're looking from face on. It's not like this, like it
will be in the follow through. So, 90 degree angle from
face on, or sharper. And then as we rotate through,
level with the ground. Another two, three minutes, however long it takes you
to get the feel with that. Now, once you get that overall feel, you notice on all these, we did a shift, and then a swing down.
The shift part is very important. If you're gonna play good golf, we have to hit this golf ball, and then hit the turf in front. There's two ways to feel this. I like to feel this by doing
the little foot press drill, like we just did, where I get to the back swing, I press my foot into the ground,
and then rotate on through. And I like to verify that
I'm actually doing this with a little divot board
here, which is a fantastic, this training gadget is so dag-gone good. I just love it. So I'm gonna go ahead and
do that same drill now where I go halfway back, shift, (club clapping ball)
and then I go ahead, and rotate on through.
I went to a little too
far there, that's fine, but I want to feel like
I really extend on out. Now there, you notice if
this was the golf ball, I would have hit the ball, come down, and then hit the turf in front. Absolutely a great drill, because it gives me feedback
of exactly where I hit. I would have known if the
sequence it started turning over just before the golf ball, that
it would have been a chunk. I need to shift a little bit more. So if you shift enough,
and you rotate through, that divot always gonna be in front.
So the last piece of this,
it's really, really important. I see so many players,
when they get that shift, they start to come over the top. So if I'm looking from down the line, I get that little half swing, I shift, and as I rotate on through, now, all of a sudden
I'm coming over the top, my club gets steep out here,
and I swing right to left. So again, if I do that on the divot board, let's go ahead and hit one here. (golf club clapping) There we go, so I swung way left, and the thing that I love about this is my divot board is gonna show me that I'm swinging to the left. So even though I hit that
right at the golf ball, the path is going way over here. So if my divot board is
square to my target line, you see that my divot is
moving from right to left across that, and I may have exaggerated
there for this video, but you can tell, even if your
divot is a lot more square, that's a little bit to the left.
This is a little bit to left. Anything that's not perfectly straight with these yellow lines is
a little bit to the left. So the last piece that
I like to do on here with this divot board that's fantastic, is I want to make sure that my hands are releasing down the target line. I don't want them turning back into left. So that's the last piece of this drill you're gonna do for a couple of minutes. So I'm gonna go ahead
and get my ball in there. Halfway back, I shift to the left, and then here's the big piece from here. I don't want to get my hands
and arms out here like this, my left arm this way. I want to get my left
arm more to the inside, and as I rotate through,
and my club is extending, I don't want my club to extend over here toward the left wall.
I want my club to extend a
little bit more to the right, so I can promote an inside-out swing path. So I'll try this one more time. I'm gonna hit a nice draw, and then we're gonna take a
look at the divot board also. (club clapping ball) There we go. Nice draw there. I swung inside out slightly, and look how much straighter
that is on the divot board now.
So I'm looking at this line
here as I hit the golf ball, and just past that nice and straight. I release the face a little bit, so now we can see that
nice tight little draw. It gives you fantastic feedback for that. Now, if you want to get one
of these different boards for yourself, just go down to
link below in the description. You can pick one up there. They're nice enough to where
they give us a few bucks for everyone that buys from that link, helps us to make some more great content. You don't have to have this divot board. You can go to the range,
watch your ball flight, look at your own divots, but this is fantastic because
it works indoors and outdoors.
And man, I just absolutely
love this thing. Now the last piece here is
how do we square up the face? So you know that I swung nice and square as I hit that last shot, but a lot of times what
I'll see players doing is trying to square up the face by rolling the forearms over each other. You don't want to do that. You want to use the wrist in a way where you can come from the inside, square up the face, and
still have this shafting, and that's what the pros are doing. I call it the anti-roll method, and I'm gonna play one of my best videos. It's gonna show you exactly how to do it. So if you start coming down steep, and feel like you stand
up out of your posture, and flip the club to square it up, this is the perfect video for you. You got to learn this anti-roll method. All you need to do is go ahead
and click one of the cards that pops up in the screen,
somewhere in the screen.
If you don't see that, don't worry. Just go down to link in the description. I'll have a link down there that'll give you instant
access to this video. Let's go and get started right now. I want to teach you the anti-roll method. Here's the bottom line, if you've been taught to roll the club in the early down swing, that causes the shaft to get steep, and that steep club
causes all your problems, 'cause you to hit it way
behind the big hitters, and way inconsistent with
your quality of strikes. You're in the tall grass and the trees and the
hazards all day long. Now the great news is this, there's really only two pieces that you need to know to
fix all these problems. The first one is we need
to learn the proper way to square up the club face. Instead of rolling the
forearms and getting steep, there's another way that the pros do this. Once you learn this right way
to square up the club face, then you can shallow out from the inside, and everything starts to fit together.
Now I'm gonna teach you this right now, and what I call the anti-roll method. You may also hear this
called the motorcycle move, or the tour twist, but let's walk through
exactly how to do that. Now, what I want you to do is go ahead and go kind
of in the last parallel in the downswing. So here, I want my hips to
go ahead and be opening up, I want my club to be
parallel with the ground, and I want my hands to be
in front of my right thigh. Now, when I take my grip, you're gonna notice that when I do this, the club face is basically
straight up and down.
So if I'm looking at it from this angle, you'll see the face is
straight up and down, and my logo of my glove is
pointed out in front of me. Now, from there..