Hi, this time I'll show you how to replace the rubber mountings of the rear axis at a Golf Mk1 The replacements for the rubber bushs are made of polyurethane For this repair I have to jack the whole rear axis, thus I secure the car at the front wheels Before jacking the car, I loosen the wheel bolts I remove the bolt caps. They are still original, what a quality Jack the car at the rear axis support and support it at this holders One side is up and on the jack stand Now I am going to check the other side in the same way I will lower the whole axis carrier now The brake hoses here are to short, thus I have to disconnect them from the brake lines The axis carrier is mounted on 4 bolts Now we have the choice, either I open the bolts here or the nut on top of the shock absorber Apply some rust remover to the bolts Because I jacked the car not very high, I have to remove the wheels to lower the axle carrier For opening the brake hoses use in any case a flare nut wrench The screw caps I made myself This connection was fastened very hard The other method to close the lines I open the nut of the struts They are under these covers For opening the nut you'll need such an long open socket or a box-end wrench The fitting selfmade tool for these would look like this one, which fits for an Audi Only loosen the nut, don't remove it Same procedure for the other side Now, I am going to open the nuts on the axle carrier Let's hope that I don't kill a stud Let's start! Ah it was easier than I expected Also no problem on the other side Now the axle carrier will come down, thus I support it with a jack That's a jack.
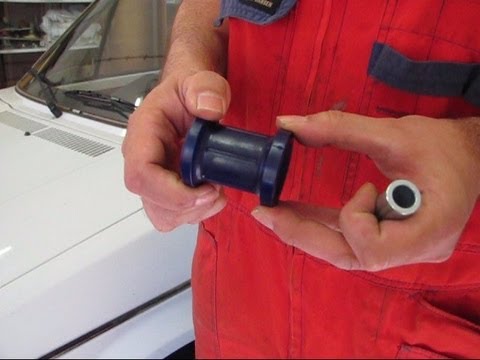
It is from a 1951 Volkswagen On the rear side are also nuts Lower the axle slowly Take care on the parking brake cables I'll open the nut on the long bolt thru the axle mount Keep the positon of the mount in mind Open the nut The plane washer is on the inner side The round washer is on the outer side The round side of the block is on the outside Some cracks outside but for 30 years, a very good quality A VW-garage would have replaced the whole mount, but the spare part isn't avaiable anymore Thus we have to replace the rubber bush in the mount with a polyurethane bush Apply some glycerine to rubber bush and press it out Pressing the polyurethane bush in the mount will be a hard job We tried to press it straight in, but it was hopeless Either it went to the side or it became very thick We'll press the bush now from the side and then we will turn it in the mount Apply the special grease, it looks like vaseline And now the metal bush The concave washer to the concave outside of the mount The flat washer at the inner side Insert it in the hole of the axle carrier the small washer and of course we use a new lock nut By the way, the thread is 12 x 1.5 mm The nut on long bolt gets 70 Nm Using the jack I lift the carrier in position and the nuts for the other side Fasten the nuts of the carrier with 45 Nm The axle carrier is now fixed at the front Thus I fasten the nuts on the stud bolts and finally I fasten the nuts with 35 Nm Install the nice caps That's it for the upper side Connect the brake hoses Now all parts are installed, but we have still to bleed the brake system Of course you may use the old method by pumping with the pedal I use a special lid with a tyre valve and the compressor Fill the reservoir completely Install the special lid Of course you cannot use the full pressure, 2 bar is fine Open the bleeding valve Apply the 2 bar carefully to the reservoir We press the air and the old brake fluid thru the system Don't forget to refill the reservoir during the bleeding Let's check if the bleeding is complete Just press the pedal.

The predal must have a good resistance Clean all surfaces which have been in contact with the brake liquid I use my special method At the end I install the wheels Don't miss the hub cap made out of plastic Remove the stop-blocks Finally I fasten the wheel bolts with 90 Nm Fasten the bolts in a cross pattern Check the level again, it must not be at maximum, we haven't installed new rotors or pads This repair is finished With the polyurethane bushes it will drive like my Porsche with M30 Bye, Bye! See you in our next video.